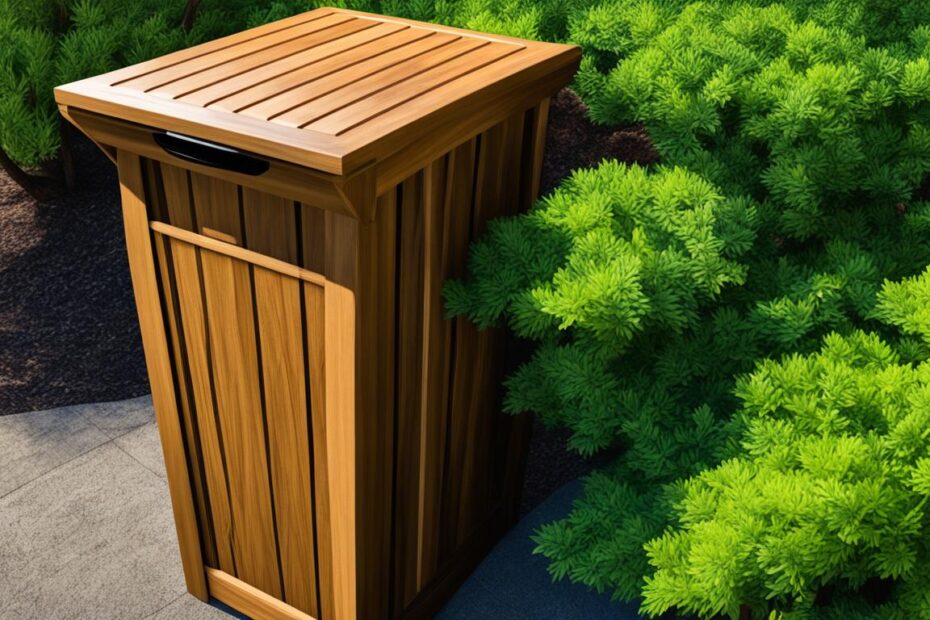
In this section, we will provide detailed woodworking plans for building your own outdoor trash can. These plans will help you create a functional and durable waste solution for your outdoor space. By following these step-by-step instructions, you can customize your trash can to fit your specific needs and style preferences. Whether you're a seasoned woodworker or a beginner, these plans are designed to be adaptable and accessible to all skill levels. Get ready to create a stylish and practical outdoor trash can with these woodworking plans.

Key Takeaways:
- Build your own outdoor trash can using these woodworking plans.
- Customize the trash can to fit your specific style and needs.
- These plans are suitable for all skill levels.
- Follow the step-by-step instructions for a functional and durable waste solution.
- Create a unique and personalized outdoor trash can.
Materials and Tools Needed
To start building your outdoor trash can, you will need the following materials and tools:
- Two 1x12x96″ boards
- 21 1-1/4″ pocket hole screws
- Wood glue
- Two hinges
- Finish of your choice (e.g., stain, paint, or sealant)
- Pocket hole jig (optional)
Having the right materials and tools is essential to ensure a successful outcome. The 1x12x96″ boards will serve as the main components of the trash can, providing the necessary structure and durability. Pocket hole screws will be used to securely join the boards together, while wood glue will enhance the overall strength of the construction. The hinges will enable easy access to the trash can, allowing for hassle-free disposal of waste. Don't forget to choose a suitable finish to protect the wood and transform your trash can into a visually appealing addition to your outdoor space. While a pocket hole jig is optional, it can be a valuable tool for creating strong and sturdy joints in the assembly process.
Building the Base and Legs
In this section, we will guide you through the process of building the base and legs for your outdoor trash can. These foundational components are crucial for creating a sturdy and functional waste solution for your outdoor space.
To begin, you'll need to cut all the necessary pieces according to the provided cutlist. This will ensure that you have the correct measurements and dimensions for your base and legs. Once you have all the pieces ready, you can start assembling them using butt joints, glue, and brad nails.
If you have a pocket hole jig, you can further reinforce the joints by using pocket hole screws. This will add extra strength and stability to your outdoor trash can. Remember to position the pocket holes on the inside to maintain a neat and polished appearance.
Adding Stability and Aesthetics
Consider adding some type of detail to the bottom of the legs to prevent wobbling on uneven surfaces. This can be achieved by attaching small feet or using decorative molding to provide extra stability and enhance the overall aesthetics of your trash can.
Furthermore, you should ensure that the base is set at the appropriate height to hide it from view when the trash can is assembled. This will create a more seamless and cohesive look for your outdoor space.

Tips for Building the Base and Legs
- Measure and cut all pieces according to the provided cutlist
- Assemble the base and legs using butt joints, glue, and brad nails
- Reinforce joints with pocket hole screws if you have a pocket hole jig
- Add detail to the bottom of the legs for stability and aesthetics
- Set the base at the appropriate height to hide it from view
By following these steps and tips, you'll be well on your way to building a solid and visually appealing base and legs for your outdoor trash can.

Building the Lid Assembly
In constructing your outdoor trash can, the lid assembly plays a crucial role. It consists of the front piece, the actual lid, and the top piece. To achieve the desired shape, angled cuts are required on one face of these components. Whether you opt for pocket holes or alternative methods like glue and brad nails, ensure a secure assembly. Attach support strips to guarantee that the lid sits firmly atop the trash can. Remember to position all pocket holes on the inside during lid assembly. Before applying your chosen finish, be sure to sand the entire trash can, creating a smooth and polished surface.

Note: The lid assembly is an essential step in the construction process of your outdoor trash can. It is advisable to carefully follow the instructions provided in order to achieve a durable and functional lid that complements the overall design of your trash can.
Customization Ideas
While the provided plans serve as a foundation, you can customize your outdoor trash can to suit your specific needs and preferences. Let your creativity shine by transforming it into something unique and functional. Here are some ideas to get you started:
- Podium: Replace the front leg with shelves to create a podium where you can display plants or decorative items.
- Storage Shelves: Add additional shelves or compartments to turn your outdoor trash can into a convenient storage solution for gardening tools or other outdoor essentials.
- Dog Feeder: Modify the design to include a separate section for pet food, making it a dual-purpose station for waste and feeding.
The possibilities are endless when it comes to customization. Feel free to experiment, adapt the plans, and make them your own. Let your outdoor waste solution reflect your style and meet your specific requirements.
Example of Customization:
I decided to convert my outdoor trash can into a convenient storage solution. By adding two extra shelves, I now have a dedicated spot to store my gardening tools, potting soil, and watering cans. It keeps everything organized and easily accessible whenever I'm working in the garden. The best part is that it still functions as a trash can, so there's no compromise on functionality.
Benefits of Customization:
Customizing your outdoor trash can offers several advantages:
- Maximizes functionality by incorporating additional features.
- Allows you to adapt the design to your specific needs and preferences.
- Creates a unique and personalized outdoor waste solution.
- Enhances the aesthetic appeal and complements your outdoor space.
By customizing your outdoor trash can, you can transform it into a versatile and eye-catching piece that not only handles waste disposal but also serves additional purposes.
Building a Trash Can Cover Box
If you prefer to hide your trash can completely, you can build a trash can cover box. This can be a simple wooden box that houses the trash can and keeps it stored away next to your house. The cover box can be made using 2x4s and 1x4s, along with hinges and a latch for easy access. Follow the provided plans and measurements to construct the cover box. Apply an exterior finish of your choice to protect the wood and enhance its appearance.
| Materials Needed | Tools Needed |
|---|---|
|
|
Conclusion:Outdoor Trash Can Woodworking Plans
Building your own outdoor trash can or trash can cover box can be a rewarding woodworking project. With our detailed outdoor trash can woodworking plans, you can create a stylish and functional waste solution for your outdoor space. By following the step-by-step instructions and using your creativity, you can customize the design to fit your specific needs and preferences.
Once you complete your woodworking project, you'll have a well-crafted outdoor trash can that not only meets your requirements for durability but also enhances the aesthetics of your outdoor area. Whether you choose to build a standalone trash can or a cover box, our plans provide the foundation for a successful DIY project.
Don't forget to adapt the plans as necessary to better suit your unique style and practical needs. The beauty of woodworking is the ability to customize and add personal touches to your creations. Put your skills to work and take pride in the craftsmanship of your DIY outdoor trash can or cover box.
With our outdoor trash can woodworking plans, you'll be equipped with the knowledge and guidance needed to create a functional and visually appealing waste solution. Start your woodworking adventure today and enjoy the benefits of a well-designed outdoor trash can that seamlessly fits into your outdoor space.
FAQ
Can I customize the outdoor trash can to fit my specific needs and style preferences?
Yes, the provided woodworking plans can be adapted to suit your specific needs and style preferences. You can customize the size, finish, and design elements of the outdoor trash can to match your outdoor space.
Are these woodworking plans suitable for beginners?
Yes, these woodworking plans are designed to be accessible to all skill levels, including beginners. The step-by-step instructions provide detailed guidance on each stage of the construction process.
What materials and tools do I need to build my own outdoor trash can?
To build your own outdoor trash can, you will need two 1x12x96″ boards, 21 1-1/4″ pocket hole screws, wood glue, two hinges, a finish of your choice (e.g., stain, paint, or sealant), and a pocket hole jig (optional).
Can I use alternative methods of assembly instead of pocket hole screws?
Yes, if you do not have a pocket hole jig or prefer alternative methods, you can use glue and brad nails for assembly.
Can I use the provided woodworking plans to build a trash can cover box?
Yes, the provided woodworking plans can be adapted to build a trash can cover box. You will need 2x4s, 1x4s, hinges, and a latch to construct the cover box.
How can I ensure my outdoor trash can is durable and functional?
To ensure durability and functionality, make sure to use sturdy materials, such as 1×12″ boards, and secure the assembly with strong joints using pocket hole screws, glue, and brad nails. Additionally, consider adding support strips and details to prevent wobbling on uneven surfaces.
How can I protect the wood and enhance the appearance of my outdoor trash can?
You can apply an exterior finish of your choice, such as stain, paint, or sealant, to protect the wood from weathering and enhance its appearance.
Can I use these woodworking plans to build something other than an outdoor trash can?
Yes, the provided plans serve as a foundation that can be adapted to create other woodworking projects, such as a podium, storage shelves, or a dog feeder. Use your creativity to customize the plans and create a unique solution for your needs.
Source Links
- https://jayscustomcreations.com/2013/12/how-to-make-a-wooden-trash-can/
- https://www.woodshopdiaries.com/diy-trash-can-cover/
- https://wilkerdos.com/garbage-can-enclosure/
